Integrating Zapier with your .NET backend enables real-time workflow automation, seamless data updates, and direct connectivity with thousands of external SaaS tools. This comprehensive guide walks you through implementing a production-ready, secure Zapier webhook in .NET — including API key authentication middleware and auditable data storage. Whether you are building for a ranch management system, an ERP platform like CattleCMS, or any data-driven application, these patterns will serve as a solid foundation.
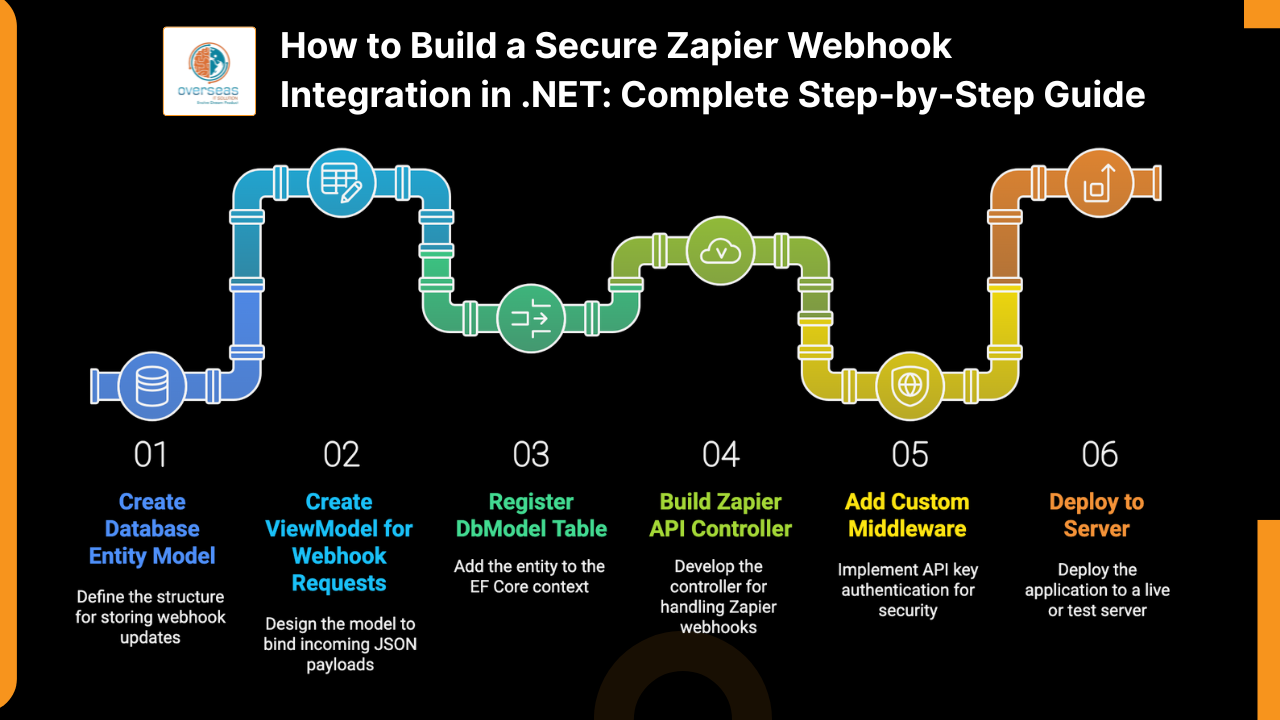
- An Entity model to store webhook updates
- A ViewModel for the Zapier payload
- An API controller dedicated to Zapier
- Custom middleware for API key authentication
- Production-ready deployment tips
Why Build a Zapier Webhook?
Zapier connects your platform with 6,000+ apps and can push real-time updates to your backend — for example, when a cattle health form is updated externally. To support this reliably, your integration needs:
- A secure webhook endpoint
- API key authentication
- Clean, validated data handling
- Error logging and structured exception management
- A deployable, maintainable architecture
Step 1 — Database Entity Model
Create an EF Core entity that stores every incoming update so your records remain fully auditable:
public class AnimalStatusHistory
{
    public int Id { get; set; }
    public int? AnimalId { get; set; }
    public eStatus Status { get; set; }
    public eStatus? PreviousStatus { get; set; }
    public DateTime UpdatedAt { get; set; }
}Step 2 — ViewModel for Incoming Requests
Zapier sends JSON payloads with string values. Bind those into a ViewModel and convert strings to enums server-side to maintain type safety:
public class AnimalStatusUpdateRequest
{
    public string NewStatus { get; set; }
    public string? OldStatus { get; set; }
    public DateTime? UpdatedAt { get; set; }
}
Step 3 — Register DbSet in ApplicationDbContext
Add the new DbSet so EF Core can track and migrate the table:
public DbSet<AnimalStatusHistory> AnimalStatusHistories { get; set; }Step 4 — Zapier API Controller
Create a controller dedicated to Zapier webhooks. Keep controller-level auth open using [AllowAnonymous] and enforce API key security via middleware (covered in Step 5). This separation of concerns keeps your controller clean and testable.
[AllowAnonymous]
[ApiController]
[Route("api/[controller]")]
public class ZapierController : ControllerBase
{
    private readonly ApplicationDbContext _db;
    private readonly ILogger<ZapierController> _logger;

    public ZapierController(ApplicationDbContext db, ILogger<ZapierController> logger)
    {
        _db = db;
        _logger = logger;
    }

    [HttpGet("test")]
    public IActionResult Test()
    {
        return Ok(new { message = "Zapier authentication successful" });
    }

    [HttpPost("UpdateAnimalStatus")]
    public async Task<IActionResult> UpdateAnimalStatus(
        [FromBody] AnimalStatusUpdateRequest model)
    {
        try
        {
            if (model == null)
                return BadRequest("Invalid payload");

            if (!Enum.TryParse<eStatus>(model.NewStatus, true, out var newStatusEnum))
                return BadRequest($"Invalid status: {model.NewStatus}");

            eStatus? oldStatusEnum = null;
            if (!string.IsNullOrEmpty(model.OldStatus) &&
                Enum.TryParse<eStatus>(model.OldStatus, true, out var parsedOldStatus))
            {
                oldStatusEnum = parsedOldStatus;
            }

            var entry = new AnimalStatusHistory
            {
                Status = newStatusEnum,
                PreviousStatus = oldStatusEnum,
                UpdatedAt = model.UpdatedAt ?? DateTime.UtcNow,
            };

            await _db.AnimalStatusHistories.AddAsync(entry);
            await _db.SaveChangesAsync();

            return Ok(new { message = "Status updated successfully" });
        }
        catch (Exception ex)
        {
            _logger.LogError(ex, "Zapier status webhook failed");
            return StatusCode(500, "Internal server error");
        }
    }
}
Step 5 — Custom Middleware for Zapier API Key Security
Validate an API key received either in the request header or as a query string parameter. Centralizing this logic in middleware keeps your controller code simple and ensures every request to the Zapier route is authenticated consistently.
public class ZapierApiKeyMiddleware
{
    private readonly RequestDelegate _next;
    private const string APIKEYHEADER = "X-API-KEY";

    public ZapierApiKeyMiddleware(RequestDelegate next)
    {
        _next = next;
    }

    public async Task InvokeAsync(HttpContext context, IConfiguration config)
    {
        if (context.Request.Path.StartsWithSegments("/api/Zapier",
            StringComparison.OrdinalIgnoreCase))
        {
            string expectedKey = config["Zapier:ApiKey"];
            string receivedKey = null;

            if (context.Request.Headers.TryGetValue(APIKEYHEADER, out var headerKey))
            {
                receivedKey = headerKey;
            }
            else if (context.Request.Query.TryGetValue("api_key", out var qsKey))
            {
                receivedKey = qsKey;
            }

            if (receivedKey == null)
            {
                context.Response.StatusCode = 401;
                await context.Response.WriteAsync("Missing API Key");
                return;
            }

            if (receivedKey != expectedKey)
            {
                context.Response.StatusCode = 403;
                await context.Response.WriteAsync("Invalid API Key");
                return;
            }
        }

        await _next(context);
    }
}
Registering the Middleware
Register the middleware in Program.cs or Startup.cs before routing is configured:
// Program.cs (minimal hosting)
app.UseMiddleware<ZapierApiKeyMiddleware>();
// then app.UseRouting(); app.UseEndpoints(...);
Step 6 — Deploy and Test
Store the API Key in Configuration
Add your API key to appsettings.json. In production, prefer environment variables or a secrets manager over plain config files:
"Zapier": {
  "ApiKey": "YOUR_SECURE_KEY_HERE"
}
Deployment Checklist
- Upload the blog image to
/upload/blog/and set the blog'simage1to the filename (e.g.,dotnet-zapier-webhook-integration-guide.jpg). - Provide Zapier with the full endpoint URL, for example:
https://yourdomain.com/api/Zapier/UpdateAnimalStatus. - Configure Zapier to send the API key either as the header
X-API-KEYor as the query parameter?api_key=.... - Use the
/api/Zapier/testendpoint to validate connectivity from Zapier before going live. - Monitor application logs and confirm your EF Core migrations have created the
AnimalStatusHistoriestable in the database.
Conclusion
With these six steps your .NET application will have a secure, scalable, and Zapier-ready webhook integration that stores every incoming update as an auditable record. The architecture is intentionally straightforward — making it easy to extend for other automation scenarios such as inventory management, payment processing, or CRM synchronization.
- Validate the full payload structure and map a Zapier custom field to populate
AnimalIdcorrectly. - Apply rate limiting or request throttling to protect the database under high-volume burst events from Zapier.
- Optionally implement HMAC payload signing for stronger verification alongside API keys.
- Return structured webhook responses so Zapier can intelligently retry on failure or mark tasks as successful.
— Overseas IT Solution
